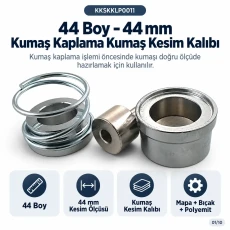
This 44L fabric cutting die prepares 44 mm / 1.73 in circles before a fabric-covered button moves into the covering stage. The set includes the Mapa, cutting blade and Polyemit base. Its job is fabric preparation only; it does not form the finished button. The prepared circle is intended for the 44L / 28 mm / 1.10 in shank-button family.
Why Use a Dedicated 44 mm Cutting Die?
Covered-button production is easier to repeat when each fabric circle starts at the same diameter. Freehand cutting can introduce small variations that may not look important before covering but become visible when the textile wraps around the shell. The 44 mm cutting die creates a consistent preparation target for the 44L size family.
44 mm Is the Fabric Size, Not the Finished Button Size
The fabric circle is 44 mm / 1.73 in, while the finished button is 28 mm / 1.10 in. The extra diameter provides the material needed to cover the front, wrap the edge and gather behind the shell. These two measurements belong to different steps and should never be treated as interchangeable.
After preparation, transfer the circle to the 44L / 28 mm / 1.10 in shank-button covering die. The cutting tool prepares the textile; the covering die handles the next operation.
What Comes in the Set?
| Mapa | Supports positioning in the cutting setup |
| Cutting blade | Creates the 44 mm / 1.73 in circular cut |
| Polyemit base | Provides lower support during cutting |
Prepare the Textile Before You Cut
Lay the material flat without stretching it. Slippery fabrics can shift, stretch textiles can distort under tension and thick materials can resist the cut more than lightweight woven fabric. The first few circles should be treated as samples rather than as part of the finished batch.
If backing, interfacing or several textile layers will be used in the finished button, test the real stack. A single-layer test may not predict how the final construction behaves.
Pattern Placement Starts at the Cutting Stage
With stripes, checks, logos or directional motifs, decide the visible center before cutting. If several buttons will be used together, keep the same visual reference across the set. Brushed or shiny fabrics should also be kept in a consistent surface direction.
Recommended Preparation Workflow
- Lay the production textile flat.
- Mark the motif center or surface direction if needed.
- Prepare the 44 mm / 1.73 in circle.
- Inspect the edge and overall shape.
- Set aside the first pieces as samples.
- Move one sample to the 44L / 28 mm covering stage.
- Inspect the completed button.
- Continue cutting only after the sample is approved.
Who Uses This Cutting Tool?
This cutting die is useful for tailoring, boutique apparel production, costume departments, sample rooms and other workshops that prepare multiple covered buttons from the same textile. It helps the operator establish a repeatable fabric preparation size before the next production step begins.
Check the Full Size Relationship Before Ordering
Confirm all three values: 44L size class, 44 mm / 1.73 in fabric cut and 28 mm / 1.10 in finished button diameter. The cut size is intentionally larger than the finished button. If your target finished button or fabric preparation size is different, choose the matching size family instead of forcing the wrong tool into the process.
Use the fabric-covered button tools category to compare other cutting and covering combinations.
Technical Details
| Tool type | Fabric cutting die / cutting set |
| Size class | 44L |
| Fabric cutting diameter | 44 mm / 1.73 in |
| Companion finished button | 28 mm / 1.10 in shank-style button |
| Set components | Mapa, cutting blade, Polyemit base |
| Main function | Prepares fabric before covering |
| Does it cover the button? | No |
How to Judge the First Cut
Compare the first few circles for shape, edge quality and signs of textile movement. If the fabric stretched or shifted, correct the preparation before continuing. Then move one sample through the covering stage. This connects the 44 mm preparation measurement directly to the final 28 mm button result.
Why a Reference Sample Helps on Reorders
Store one approved 44 mm / 1.73 in fabric circle with one completed 28 mm / 1.10 in button. That reference makes later production easier, reduces confusion between cut size and finished size and helps a different operator follow the same setup.
When the Fabric Changes, Test Again
The cutting diameter can stay the same while the textile changes completely. A heavier, stretchier or layered fabric may behave differently during both cutting and covering. For that reason, a new fabric deserves a new sample even when the same 44L tools are used.
Quick Pre-Production Checklist
- Confirm a 44 mm / 1.73 in fabric-circle target.
- Confirm the 44L / 28 mm / 1.10 in finished button family.
- Check that the textile is flat and not stretched.
- Plan the motif center or surface direction.
- Complete one cut-to-cover sample before preparing the full batch.
Quality Check After the First Few Cuts
Place the first circles side by side and compare the overall shape, edge quality and any signs of stretching or shifting. Then take one sample through the covering stage. This confirms that the 44 mm / 1.73 in circle works with the real production textile before more material is consumed.
Why Fabric Changes Require New Samples
A stable woven textile, a stretch knit and a thick layered material can all behave differently even though the same 44 mm cutting die is used. The tool controls the target diameter, but it does not remove the physical differences between fabrics. Test the new material before a full batch.
Pre-Order Verification
Confirm that you need a 44 mm / 1.73 in fabric circle for the 44L / 28 mm / 1.10 in shank-button family and that your goal is fabric preparation rather than the covering operation. This check helps avoid ordering the cutting tool when the actual need is the covering die.
Production Note
Record the 44L size class, 44 mm / 1.73 in cut and 28 mm / 1.10 in finished button together on the work card so the preparation and finished measurements stay clear on repeat orders.
Frequently Asked Questions
Does this tool cover the button?
No. It prepares the fabric circle only.
What diameter does it cut?
44 mm / 1.73 in.
Which finished button does it pair with?
The 44L / 28 mm / 1.10 in shank-button family.
What is included in the set?
Mapa, cutting blade and Polyemit base.
Can patterned fabric be cut?
Yes. Choose the visible center and direction before cutting.
Should heavy or stretch fabric be tested?
Yes. Material behavior can change even when the cut diameter stays the same.
Separate the 44L cutting set clearly in the tool room
A label that says only “44” can be ambiguous. Use a fuller identifier such as “44L / 44 mm cut / 28 mm finished button.” This makes it easier to distinguish the cutting set from a covering die and from other similar-looking tools stored nearby.
Use a visual reference for repeat orders
Keep a photo or physical sample of the approved button with the job file. Measurements do not capture motif center, fabric direction or surface appearance. A visual reference gives the next operator a clearer target when the same customer item returns.
Revalidate when the fabric lot changes
The cutting die and finished-button family may remain the same while the textile lot changes. Small differences in stretch, coating or surface feel can affect how fabric cuts and covers. Prepare a small first group from the new lot before a long batch.
Operator start-up check
Before production, confirm the die size, keep the set components together, identify fabric direction and make sure the covering tooling for the next stage is ready. A short start-up checklist can prevent downtime caused by missing components or an incorrect size selection.
Move cut pieces to the covering station with clear identification
Store the 44 mm / 1.73 in circles in a labeled container before they move to the covering station. If several sizes are active at the same time, visual separation alone is not reliable. Add the size class and model code to the material container.
Update the job record after production
At the end of the run, record the textile lot, operator notes, any production issues and the settings that worked well. These details make future repeat orders easier to start and are especially useful for seasonal styles that may return months later.
Quick pre-order check
- Is 44L the correct size class?
- Is a 44 mm / 1.73 in fabric cut required?
- Is the related finished-button family 28 mm / 1.10 in?
- Are cutting and covering tools planned separately?
- Has press compatibility been verified?
- Will the new textile be sampled first?
Additional workshop note
Clear labels for size, function and tool pairing reduce dependence on verbal instructions. When the textile type or lot changes, a short sample check and an approved reference piece help the next production run stay consistent.
Additional workshop note
Clear labels for size, function and tool pairing reduce dependence on verbal instructions. When the textile type or lot changes, a short sample check and an approved reference piece help the next production run stay consistent.
Additional workshop note
Clear labels for size, function and tool pairing reduce dependence on verbal instructions. When the textile type or lot changes, a short sample check and an approved reference piece help the next production run stay consistent.

.jpg-40x40.webp "Magnetic Snaps Buttons")

.jpg-40x40.webp "Prong Snap Fasteners for Baby Clothes")


.jpg-40x40.webp "Curved Snaps Buttons")


.jpg-40x40.webp "Snap Fasteners Half Dome type")
-no5-k0010%20(3).jpg-40x40.webp "Eyetlets")


-K0014.png-40x40.webp "Steel Eyelets and Iron Metal Grommets")

.jpg-40x40.webp "Flat Brass Eyelets and Grommets")

.jpg-40x40.webp "Aluminum Eyelets and Grommets")


.jpg-40x40.webp "Galvanized Eyelets and Grommets")


.jpg-40x40.webp "Hole Cutter Tools and Punching Dies")

.jpg-40x40.webp "Grommet Punching Dies")


.jpg-40x40.webp "Pearls Types")


.jpg-40x40.webp "Rivets")


.jpg-40x40.webp "Water-Repellent Jacket Zippers")


.jpg-40x40.webp "Tires")

.jpg-40x40.webp "Round Braided Elastic Cord")


.png-40x40.webp "Enameled Buttons")


.png-40x40.webp "Two Hole Sewing Buttons")


.jpg-40x40.webp "Carabiner Clips, Snap Hooks and Bag Hooks")


-PhotoRoom.png-40x40.webp "Spring Rings, Key Rings and Snap Clamps")


.png-40x40.webp "Hook and Eye Closures Sew-On")



.webp-630x630.webp "44L 44 mm Fabric Cutting Die for Covered Buttons")
.webp-630x630.webp "44L 44 mm Fabric Cutting Die for Covered Buttons")
.webp-630x630.webp "44L 44 mm Fabric Cutting Die for Covered Buttons")
.webp-630x630.webp "44L 44 mm Fabric Cutting Die for Covered Buttons")
.webp-630x630.webp "44L 44 mm Fabric Cutting Die for Covered Buttons")
.webp-630x630.webp "44L 44 mm Fabric Cutting Die for Covered Buttons")
.webp-630x630.webp "44L 44 mm Fabric Cutting Die for Covered Buttons")
.webp-630x630.webp "44L 44 mm Fabric Cutting Die for Covered Buttons")
.webp-630x630.webp "44L 44 mm Fabric Cutting Die for Covered Buttons")
.webp-630x630.webp "44L 44 mm Fabric Cutting Die for Covered Buttons")
.webp-630x630.webp "44L 44 mm Fabric Cutting Die for Covered Buttons")
.webp-630x630.webp "44L 44 mm Fabric Cutting Die for Covered Buttons")
.webp-80x80.webp "44L 44 mm Fabric Cutting Die for Covered Buttons")
.webp-80x80.webp "44L 44 mm Fabric Cutting Die for Covered Buttons")
.webp-80x80.webp "44L 44 mm Fabric Cutting Die for Covered Buttons")
.webp-80x80.webp "44L 44 mm Fabric Cutting Die for Covered Buttons")
.webp-80x80.webp "44L 44 mm Fabric Cutting Die for Covered Buttons")
.webp-80x80.webp "44L 44 mm Fabric Cutting Die for Covered Buttons")
.webp-80x80.webp "44L 44 mm Fabric Cutting Die for Covered Buttons")
.webp-80x80.webp "44L 44 mm Fabric Cutting Die for Covered Buttons")
.webp-80x80.webp "44L 44 mm Fabric Cutting Die for Covered Buttons")
.webp-80x80.webp "44L 44 mm Fabric Cutting Die for Covered Buttons")
.webp-80x80.webp "44L 44 mm Fabric Cutting Die for Covered Buttons")
.webp-80x80.webp "44L 44 mm Fabric Cutting Die for Covered Buttons")
.png-230x230.webp "18 Boy 11,5 mm Kumaş Kaplama Düğme Kalıbı KLP0018KPL")
.webp-230x230.webp "18 Boy 18 mm Kumaş Kaplama Düğme İçin Kumaş Kesim Kalıbı KKSKKLP0007")
.webp-230x230.webp "22 Boy 22 mm Kumaş Kaplama Düğme İçin Kumaş Kesim Kalıbı KKSKKLP0008")