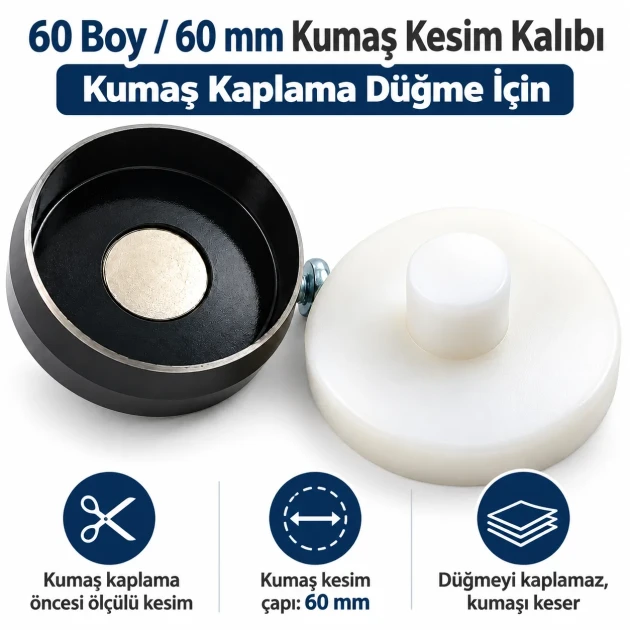
60L 60 mm / 2.36 in Fabric Cutting Die for Covered Buttons KKSKKLP0013 prepares circular fabric pieces before the separate button-covering operation. The set includes a Mapa, cutting blade and Polyemit base. It cuts fabric only and does not form the finished button. After preparation, the 60 mm / 2.36 in fabric circle moves to compatible covering tooling. This version focuses on workshop labeling, first-piece approval and repeat-order control.
60L and 60 mm / 2.36 in are different references
60L is the button-size class. The 60 mm / 2.36 in figure is the fabric cutting diameter produced by this tool. They should not be treated as two ways of writing the same finished-button measurement. Record the size class and cut diameter separately.
Where this tool belongs in the workflow
Fabric preparation comes before button covering. This die supports the preparation stage by creating a defined circular target. It does not replace the covering die. Keeping the two operations separate helps prevent purchasing and production errors.
Technical summary
| Tool type | Fabric cutting die |
| Size class | 60L |
| Cut diameter | 60 mm / 2.36 in |
| Set contents | Mapa + cutting blade + Polyemit base |
| Stage | Pre-covering fabric preparation |
Why a defined circle size matters
Freehand cutting can leave different amounts of material around each piece. A defined 60 mm / 2.36 in target provides a clearer starting point for samples and repeat orders. The die controls geometry, while the operator still manages fabric direction, tension and placement.
Fabric construction remains important
Lightweight woven fabric, stretch knit, thick decorative textile or coated material can behave differently even with the same die. Thickness, stretch and layer count can affect the cutting result. Test the actual production textile before a long run.
Validate the complete first piece
Cut a small group and inspect circle shape, edge condition and any sign of stretch. Then take at least one circle through the separate covering step. This confirms that cutting and covering work together with the real fabric and button components.
Pattern positioning
The larger 60 mm / 2.36 in circle can include more of a print or motif, making visual placement especially important. Decide what should appear on the visible button face before cutting. Keep stripes, logos, nap and directional prints aligned across the batch.
Repeat-order documentation
Record model KKSKKLP0013, 60L, the 60 mm / 2.36 in cut, textile reference and the covering tool used afterward. Explicit job notes reduce reliance on memory. When the fabric lot changes, keep the previous setup as a reference but run a short validation with the new material.
Press and machine compatibility
Do not assume universal fit. Connection details, working height and mechanical arrangement can vary. A tool that looks similar to another die may still require a different setup. Verify physical and working compatibility before production.
Keep set components together
The Mapa, cutting blade and Polyemit base belong to one working set. Store them together and label both the operation and measurement. Mixing pieces from other sizes can change the way the tool behaves.
Periodic control during longer batches
After first-piece approval, continue periodic checks. Fabric layers can shift, lint can collect and placement habits can change. Compare sample circles during the run so drift is detected before a large quantity is prepared.
Transfer to the covering station
Place cut circles in a labeled container before they move to the covering area. If several sizes are active, visual separation alone is not enough. Add 60L, 60 mm / 2.36 in and the model code to the material container.
Quality-control points
Check circle geometry, edge condition, fabric distortion, layer shift and motif center. After covering, review surface centering, excess gathering and whether the material wraps as expected. If a problem appears, evaluate cutting, textile and covering stages together.
Care and storage
Remove loose textile debris after use and store the set dry. Protect the cutting component from unnecessary contact. If performance changes, review textile type, layer count, cleanliness and workstation setup before attempting any modification.
Responsible use limits
This listing does not claim identical behavior with every textile, unlimited layer cutting or universal press compatibility. Avoid unverified grinding, sharpening or dimensional changes. The tool should be evaluated with the actual production conditions.
Pre-order checklist
- Confirm the 60L size class.
- Confirm a 60 mm / 2.36 in fabric circle is required.
- Make sure you need a cutting die, not only a covering die.
- Verify press or machine compatibility.
- Plan a sample with production fabric.
- Plan motif position for patterned material.
Frequently asked questions
What diameter does this die cut?
60 mm / 2.36 in.
Are 60L and 60 mm the same measurement?
No. One is the size class and the other is the fabric cutting diameter.
Does it cover the button?
No. It cuts fabric only.
What is included?
Mapa, cutting blade and Polyemit base.
Will it fit every press?
Universal fit should not be assumed; compatibility must be verified.
Should new fabric be tested?
Yes. Material construction can change cutting and covering behavior.
Additional production note 1
Label the 60L cutting set separately from covering dies in the tool room. Include the model code, 60 mm / 2.36 in cut and the word “cutting” so a new operator can identify the correct tool quickly.
Additional production note 2
Keep a photographed or physical approved sample with repeat-order records. It preserves visual information such as motif center and fabric direction in addition to the technical measurements.
Additional production note 3
During long runs, compare sample circles at regular intervals. Small checks can reveal layer shift or placement changes before a large amount of textile is prepared incorrectly.
Additional production note 4
Label the 60L cutting set separately from covering dies in the tool room. Include the model code, 60 mm / 2.36 in cut and the word “cutting” so a new operator can identify the correct tool quickly.
Additional production note 5
Keep a photographed or physical approved sample with repeat-order records. It preserves visual information such as motif center and fabric direction in addition to the technical measurements.
Additional production note 6
During long runs, compare sample circles at regular intervals. Small checks can reveal layer shift or placement changes before a large amount of textile is prepared incorrectly.
Additional production note 7
Label the 60L cutting set separately from covering dies in the tool room. Include the model code, 60 mm / 2.36 in cut and the word “cutting” so a new operator can identify the correct tool quickly.
Additional production note 8
Keep a photographed or physical approved sample with repeat-order records. It preserves visual information such as motif center and fabric direction in addition to the technical measurements.
Additional production note 9
During long runs, compare sample circles at regular intervals. Small checks can reveal layer shift or placement changes before a large amount of textile is prepared incorrectly.
Additional production note 10
Label the 60L cutting set separately from covering dies in the tool room. Include the model code, 60 mm / 2.36 in cut and the word “cutting” so a new operator can identify the correct tool quickly.
Additional production note 11
Keep a photographed or physical approved sample with repeat-order records. It preserves visual information such as motif center and fabric direction in addition to the technical measurements.
Additional production note 12
During long runs, compare sample circles at regular intervals. Small checks can reveal layer shift or placement changes before a large amount of textile is prepared incorrectly.
Additional production note 13
Label the 60L cutting set separately from covering dies in the tool room. Include the model code, 60 mm / 2.36 in cut and the word “cutting” so a new operator can identify the correct tool quickly.
Additional production note 14
Keep a photographed or physical approved sample with repeat-order records. It preserves visual information such as motif center and fabric direction in addition to the technical measurements.
Additional production note 15
During long runs, compare sample circles at regular intervals. Small checks can reveal layer shift or placement changes before a large amount of textile is prepared incorrectly.
Additional production note 16
Label the 60L cutting set separately from covering dies in the tool room. Include the model code, 60 mm / 2.36 in cut and the word “cutting” so a new operator can identify the correct tool quickly.
Additional production note 17
Keep a photographed or physical approved sample with repeat-order records. It preserves visual information such as motif center and fabric direction in addition to the technical measurements.
Additional production note 18
During long runs, compare sample circles at regular intervals. Small checks can reveal layer shift or placement changes before a large amount of textile is prepared incorrectly.
Additional production note 19
Label the 60L cutting set separately from covering dies in the tool room. Include the model code, 60 mm / 2.36 in cut and the word “cutting” so a new operator can identify the correct tool quickly.
Additional production note 20
Keep a photographed or physical approved sample with repeat-order records. It preserves visual information such as motif center and fabric direction in addition to the technical measurements.
Additional production note 21
During long runs, compare sample circles at regular intervals. Small checks can reveal layer shift or placement changes before a large amount of textile is prepared incorrectly.

.jpg-40x40.webp "Magnetic Snaps Buttons")

.jpg-40x40.webp "Prong Snap Fasteners for Baby Clothes")


.jpg-40x40.webp "Curved Snaps Buttons")


.jpg-40x40.webp "Snap Fasteners Half Dome type")
-no5-k0010%20(3).jpg-40x40.webp "Eyetlets")


-K0014.png-40x40.webp "Steel Eyelets and Iron Metal Grommets")

.jpg-40x40.webp "Flat Brass Eyelets and Grommets")

.jpg-40x40.webp "Aluminum Eyelets and Grommets")


.jpg-40x40.webp "Galvanized Eyelets and Grommets")


.jpg-40x40.webp "Hole Cutter Tools and Punching Dies")

.jpg-40x40.webp "Grommet Punching Dies")


.jpg-40x40.webp "Pearls Types")


.jpg-40x40.webp "Rivets")


.jpg-40x40.webp "Water-Repellent Jacket Zippers")


.jpg-40x40.webp "Tires")

.jpg-40x40.webp "Round Braided Elastic Cord")


.png-40x40.webp "Enameled Buttons")


.png-40x40.webp "Two Hole Sewing Buttons")


.jpg-40x40.webp "Carabiner Clips, Snap Hooks and Bag Hooks")


-PhotoRoom.png-40x40.webp "Spring Rings, Key Rings and Snap Clamps")


.png-40x40.webp "Hook and Eye Closures Sew-On")



.webp-630x630.webp "60L 60 mm Fabric Cutting Die")
.webp-630x630.webp "60L 60 mm Fabric Cutting Die")
.webp-630x630.webp "60L 60 mm Fabric Cutting Die")
.webp-630x630.webp "60L 60 mm Fabric Cutting Die")
.webp-630x630.webp "60L 60 mm Fabric Cutting Die")
.webp-630x630.webp "60L 60 mm Fabric Cutting Die")
.webp-630x630.webp "60L 60 mm Fabric Cutting Die")

.webp-80x80.webp "60L 60 mm Fabric Cutting Die")
.webp-80x80.webp "60L 60 mm Fabric Cutting Die")
.webp-80x80.webp "60L 60 mm Fabric Cutting Die")
.webp-80x80.webp "60L 60 mm Fabric Cutting Die")
.webp-80x80.webp "60L 60 mm Fabric Cutting Die")
.webp-80x80.webp "60L 60 mm Fabric Cutting Die")
.webp-80x80.webp "60L 60 mm Fabric Cutting Die")
.png-230x230.webp "18 Boy 11,5 mm Kumaş Kaplama Düğme Kalıbı KLP0018KPL")
.webp-230x230.webp "18 Boy 18 mm Kumaş Kaplama Düğme İçin Kumaş Kesim Kalıbı KKSKKLP0007")
.webp-230x230.webp "22 Boy 22 mm Kumaş Kaplama Düğme İçin Kumaş Kesim Kalıbı KKSKKLP0008")