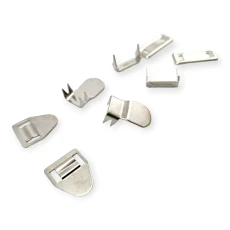
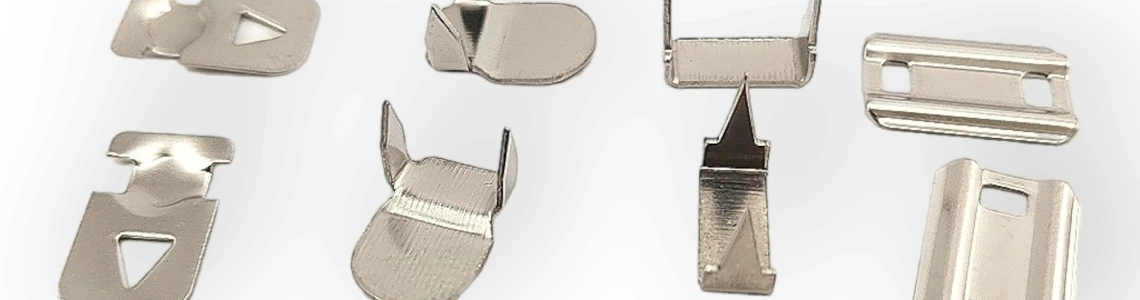
Trouser and skirt hook-and-bar fasteners provide a discreet closing point at the waistband of tailored garments. The metal hook, receiving bar and any fixing components must work together on the finished fabric. Some systems are sewn while others are applied with a dedicated setting die and press. E-Buttons sells four-piece stainless and brass closure sets as well as A010 and A050 mounting dies separately. This guide explains the applications, sizing decisions and practical installation checks that help buyers select the correct combination before sampling or production.
Why apparel manufacturers use hook-and-bar fasteners
A trouser hook-and-bar is a compact metal fastening for overlapping waistband edges. It is often used with a zipper on tailored trousers or skirts, giving the upper opening a discreet finish. The hook engages a corresponding bar, while the waistband construction holds both pieces in alignment. This fastening does not ordinarily replace the fly zipper; the hook and zipper carry out separate jobs within the same finished garment.
On a production line, selecting the correct fastener means understanding the complete assembly. The metal profile, receiving element, fixing parts and waistband thickness should work together. A hook that looks close in size may not engage the bar supplied with a different model. Before ordering, check how the waistband is constructed and where the finished garment requires the opening to close.
The complete four-part closure system
Some waistband products are sold as four-piece fastening sets. The description refers to the component arrangement used to form the closure; it is not automatically the same as the quantity of finished fastenings in a pack. A pressed construction can have hook and receiver components with additional attachment parts. Different designs use different fittings, so each item must be identified by its actual product specification.
For garment sourcing, count the number of full closures needed per size and production order. Then compare that requirement with the selling unit shown on the live product page. The words four-piece set and 250 pieces convey different information. When ordering a large quantity, make sure the hooks and corresponding receiving parts are available in the quantities required for the planned output.
Sew-on hooks and press-on closures
Sew-on garment hooks have attachment areas intended for stitching. Press-on or no-sew hook-and-bar systems use fixing components and suitable installation tooling. A no-sew description should not be understood as meaning that every model can be fitted without tools. The mounting method belongs to the actual hardware design. Check it before preparing a sample or adding the item to a sewing-line bill of materials.
Sewn attachment can be considered where the pattern and fabric support stitches at the chosen position. Pressed construction is relevant when matching metal parts, dedicated dies and a suitable press are available. The process should never be switched casually between the two types. In either case, the fastening must stay aligned without creating visible puckers or unwanted metal projections on the garment.
How a tailored trouser waistband closes
In tailored trousers, the hook typically secures the upper overlap above the fly zipper. Interfacing, a waistband facing and sometimes a separate extension can all influence the space available for the hardware. If the receiver is placed too far from the edge, the fly may pull to one side. If it is too close, the wearer may have difficulty engaging the hook without stretching the waistband.
A practical fitting starts with the completed waistband rather than just the cut pattern piece. Close the waist in its natural overlap, mark the matching component positions and trial the hardware on representative fabric. Check the result on a fitting sample while standing and seated. The front should remain tidy, and the metal should not rub against the lining or obstruct the top of the zipper.
Skirt hooks and concealed side closures
Many skirts use a hook above a center-back or side zipper to hold the upper edge in place. This is especially useful where a visible button would interrupt a clean waistline. However, a curved skirt waistband may bring the metal parts together at a different angle from a straight trouser extension. Seam allowance, lining and the finished edge all affect the placement.
Position the hook and receiver using the skirt in its closed position. A fastening that lies flat on a table may pull the skirt's waistline when worn. Check whether the receiving bar has enough room beneath the facing and whether its fixing points are adequately supported by the material. A production sample should preserve the intended silhouette while remaining easy to open.
Choosing a stainless steel hook set
The stainless four-piece trouser and skirt hook set is an available E-Buttons catalog item. It is useful when the garment specification calls for this material category. Review the actual shape of the hook and receiving component, as well as the listed package options. Stainless steel by itself does not establish universal wash performance or guarantee the same finish characteristics across different hardware families.
For a garment repair, compare the proposed hook with the existing receiver before purchase. For new production, fit the complete system to the approved fabric stack. Check that the closure engages without excessive pulling and that its fixing parts are properly supported. Retain a physical sample or model reference so later batches use the same construction rather than a similar-looking product.

Brass fastening sets for garment sourcing
E-Buttons also offers a brass four-piece trouser hook set. Buyers may consider brass when it matches the intended material selection and garment finish. Material should not be the only purchasing criterion: the hook profile and receiving element still determine the fastening action. A similarly colored metal component from another assembly should not be substituted before its fit has been checked.
On a tailored garment, a small part may still be visible near the inside waistband. Compare the finish under realistic lighting and make sure it does not introduce a prominent ridge. If the metal choice is changed after the first fitting, repeat a sample installation. A surface appearance that works with one lining color may be less suitable with another, even if the fastening dimensions are similar.

Large-size hooks and waistband room
The large-size brass trouser and skirt hook set is another model for buyers to compare. Its larger profile may suit a design that provides sufficient space on the finished waistband. It is not automatically more suitable for every heavy garment, nor should it be used simply because the fashion fabric is thick. The receiving part and the planned overlap need to accommodate the actual metal geometry.
A narrower skirt facing may make a large assembly visible through the cloth. In a reinforced trouser waistband, the same design might have adequate clearance. Compare the actual component dimensions and fixing points rather than choosing from an enlarged product photograph. If moving from a smaller fastening family, check whether the setting equipment also needs to change.
What to measure before approving a model
A garment-hook size can refer to outside length, hook opening, receiving-bar width or fixing-point spacing. These are different dimensions. When a drawing lists 9 mm, that is about 0.35 in; 11 mm is approximately 0.43 in. The conversion is useful for international buyers, but it is not enough to match components unless everyone is measuring the same feature.
Start with the finished garment overlap and the receiving-part geometry. Record the metal profile, attachment position and fabric thickness. A physical fitting test remains important even where a nominal dimension matches. For repeat orders, the exact item code and accepted sample help ensure that a later shipment contains the same compatible parts.
The A010 setting die set
Pressed installation calls for tooling designed for the particular hardware family. The A010 trouser and skirt hook setting die is offered as a separate tool product. Its listed components include two upper and two lower die pieces. Those dies are used to install the appropriate fastening; they are not themselves a package of metal garment hooks.
Check whether the chosen hook system is intended for the A010 die and whether the tool fits the available press. A similar-looking metal fitting may require a different die. Using the wrong tool could distort the fastening or produce an incomplete attachment. Sample installation on the actual waistband material should be approved before the line uses the setup repeatedly.

The A050 setting die set
The A050 trouser and skirt hook setting die is another dedicated mounting tool offered by E-Buttons. Its catalog information identifies an A050 application and a four-piece steel die set. The A050 and A010 tools serve different system families; one should not be treated as a universal substitute for the other merely because both install waistband hardware.
When testing A050 installation, inspect the metal from both sides of the waistband. Check that the securing components have seated and that the garment fabric has not been crushed or cut. The hook should enter the receiver smoothly and remain aligned. If it does not, assess the hardware model and die setup instead of immediately increasing the pressing force.

Mounting tools are available from the same store
E-Buttons sells the hardware as well as the application tools for suitable press-on systems. The trouser and skirt hook setting-dies category brings the relevant equipment together, including A010 and A050. This matters when a manufacturer is sourcing a new waistband closure: selecting the fastener without planning its mounting tool can delay sampling and production.
Once you identify the metal closure, choose a die based on its system and check the press connection. If an existing factory machine will be used, confirm that the upper and lower die elements can be fitted properly. Sew-on models may need a different process and should not be added to a press-tool purchase list without considering the actual attachment design.
Preparing the first press-on sample
The waistband sample should represent the garment's true fabric stack, including interfacing, facing and relevant seam allowances. Close the overlap in the intended position and mark the hook and receiving-bar locations. Fit the appropriate upper and lower dies to the press according to the selected equipment instructions. Position the metal components in their designed orientation before carrying out the first sample attachment.
After setting, look for uneven metal seating, sharp projections, crushed fabric or misplaced fixing points. Engage the hook several times and check the appearance on the garment's outside. If the waistband is distorted, revisit placement, die match and construction. The correct machine pressure and detailed tool sequence depend on the actual hardware and press specification.
Installing sew-on waistband hooks
Sew-on hardware uses stitched attachment points. Place the hook and matching receiving element on the finished waistband overlap, then fix them through their intended areas. The garment's fabric and reinforcement determine stitch placement. Keep the thread clear of the opening where the hook needs to engage, and avoid pulling stitches so tightly that the face fabric wrinkles.
For repairs, examine the original component before removing it. An existing press-on fastening may leave holes or marks that a sew-on replacement will not cover. In a new style, include the attachment position in the manufacturing specification. A simple opening-and-closing trial on the finished sample should confirm that the part does not rotate or catch the lining.
Pre-production quality checks
Inspect the outside waistband line with the closure engaged. The top of the fly should remain aligned, without a visible bump or unexpected gap. Inside the waistband, confirm that the receiver is stable and that metal edges are not catching fabric. Open and close the fastening repeatedly on the approved sample, and check it in normal standing and seated positions.
Different garment fabrics may require their own sampling even if the metal hook model stays unchanged. A heavy workwear waist and a lightweight tailored skirt can respond differently to the same mounting process. Keep a record of the approved hardware, cloth stack and setting tool. It is easier to resolve a production variation when the reference sample has been retained.
Ordering quantities and set components
A factory should calculate the number of complete waistband closures needed for the production run. The component count of a four-piece metal set is not identical to the number of finished fastenings in a 250-piece package. Consult the current selling-unit information on the product page before turning a garment quantity into a purchase quantity.
Keep separate lines for the hook-and-bar hardware and its installation die. A mounting die is equipment rather than a consumable fastening. Record the selected material, receiving part, model code and accepted sample. This makes repeat orders more reliable and reduces the risk of receiving a different profile under a generic description such as trouser hooks.
Buying the fasteners with compatible dies
Start at the E-Buttons hook-and-bar closure category to compare the metal options. The stainless set and brass set represent different material choices, while larger designs need their own sizing check. Once the closure model is settled, visit the setting-dies category and identify its intended installation system.
Buying hardware and tooling as a planned combination helps a workshop prepare for actual assembly, not just product delivery. Check that the die matches the selected fastening and fits the intended press. For sew-on hardware, confirm the stitching method instead. A complete, well-matched closure supports a discreet and comfortable finished waistband.
Hardware and mounting tools compared
| Model family | Purpose | Selection check |
|---|---|---|
| Stainless four-piece set | Metal waistband fastening | Receiving-bar fit |
| Brass four-piece set | Brass hardware option | Form and finish |
| Large brass set | Larger closure profile | Waistband clearance |
| A010 setting die | A010 pressed installation | Fastener and press model |
| A050 setting die | A050 pressed installation | Dedicated system and fabric |
Frequently asked questions
What is a hook-and-bar waistband fastener?
It is a metal hook and matching receiving component that hold overlapping trouser or skirt waistband edges together, often alongside a zipper.
Are hook-and-bar closures always no-sew?
No. Some products are sewn on; others use mechanical fixing parts applied with the correct setting die and press.
What is an A010 setting die used for?
It installs the appropriate A010 trouser hook system. The selected fastener and press connection must match the tool.
How does the A050 die differ?
A050 is a separate tool family intended for its own fastening system. It should not automatically be used for an A010 product.
Does E-Buttons sell mounting tools?
Yes. Dedicated trouser and skirt hook setting dies are available in the installation-tools category.
Can brass and stainless sets be exchanged?
Not without checking the receiving geometry, material and attachment design on the garment sample.
Does a 250-piece pack mean 250 completed closures?
Not necessarily. Check the actual selling unit and the component makeup of the four-piece set.
How should the first production sample be checked?
Review fabric marking, correct die selection, fully seated fixing parts, an undamaged waistband and easy hook-and-bar engagement.